Birthday Bash!

Hello everyone,

For quite a while now I have seen many people create screen cards. I thought I would create one and use it my Cards with a Difference workshop. It was a very popular addition and I may create some more at a later date.

Celebrate Today

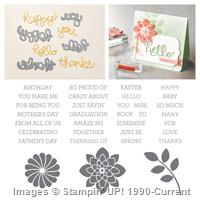
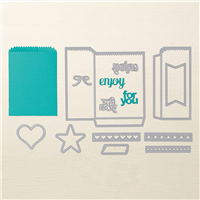
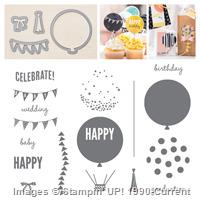
I used a few different stamp sets to create the final result but the main set used was Celebrate Today which is in the current Occasions Catalogue.


Celebrate Today


Celebrate Today

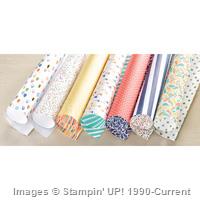
I used the paper from the Birthday Bash SDSP, also from the same catalogue. I love this paper. Its one of those ones you would like to hoard and never use. I have quite a few of those. I really do have to change my ways and start using them, otherwise they will never see the light of day and be used in some very special projects.

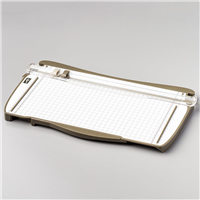
I used a 12″x6″ piece of Whisper White CS. I scored it at 3″, 6″, & 9″. Super easy but very effective. What do you think?

Thanks for dropping by,

Kirsty xx

Price: $49.95

Supply List

Built for Free Using:  My Stampin Blog

You Amaze Me!

Hello everyone,

Again it’s long time no post. I struggle to find the time to blog these days. I don’t even create as often as I used to. Things have changed in the Brown House, that’s for sure. The girls have become heavily involved in horse riding. They attend various clinics and competitions and our usual Pony Club rally days. So most weekends and some weekday afternoons are busy with that. I have this year become Treasurer of our local Pony Club and Vice President of the Primary School my youngest attend. I also volunteer in the Prep-2 classroom once a week, plus I am the uniform shop lady at the same school. I am also on the High School’s tuckshop roster. If that’s not enough, the boys will be starting soccer soon, so there is another item to add to the list. I really do need to organise myself better though, I have been known to triple booking my self on occasion. I now actually have two, yes 2, diaries on the go. One for my business and one for everything else. Maybe I should start putting in designated crafting time!!

I have still managed to hold workshops here from home. I have missed a couple last month, but I am now back in business. I thought I would share with you one of the creations from last week. I have totally fallen in love with it and I hope it inspires you to create one too.

you amaze me

I had a play with the Mini Treat Bag Thinlits Die and turned it into a card pocket. I also created a little coordinating gift box with the Tiny Treat Box.

you amaze me

I used the Crazy About You Bundle to create the title and the delicious Indescribable Gift flower stamp for the image. We used our ‘blendies’ to colour it in.

treat flower

The beautiful Bouquet Bigz Die was used to create the flower.

you amaze me

you amaze me

These could easily be turned into beautiful invites with a few changes….. I can imagine some pretty special wedding ones, just change the sentiment on the front and put the details on the card inside. I will post below the list of all products used in case you would like recreate these one, or if you are just curious as to what I used

Supply List

Built for Free Using:  My Stampin Blog

Live the Life You’ve Imagined!

Hello everyone,

Since I did the big move to Southbrook I restarted some workshops and quickly found that a scrapbook workshop is the popular choice here in this quaint little town. I haven’t shared any of these projects on my blog and thought I should start. This particular page I am sharing today was this weeks workshop.

Live the Life You've Imagined

I used quite a few stamp sets, six in fact. It is one of the reasons I love Stampin’ Up! The stamp sets coordinate well with each other. Another item I love about Stampin’ Up!, and it is totally free, is the brown packing paper in the Big Brown Box that is filled with your goodies. I use it on my projects as a DSP (designer series paper). You can tear it, scrunch it, stamp on it, spritz ink on it, anything you can think of really. It’s a great neutral ‘filler’ for your layout. It especially looks good on boy themed layouts. Can you tell I love it?!

Live the Life You've Imagined

I sprinkled Whisper White ink in one of my Stampin’ Spritzer bottles over the layout and added a few Candy Dots for a pop of colour. I also outlined some pieces including the DSP with a Basic Black Stampin’ Write marker. I use this technique to make that particular element stand out, but it’s not too much that it takes away from the photo. I used Dimensionals to lift the photo off the page and slide my three tags beneath it. I will use the white for journalling and the other two will be fillers or you can put some smaller photos on them.

Live the Life You've Imagined

It’s a great simple layout anyone can do and the ladies attending loved the workshop. It  also gave me a good excuse to crack open the NEW KRAFT CARDSTOCK!! This stuff is awesome. It is heavier than our regular CS and this is a more natural Kraft colouring. Be sure to check that stuff out, plus any of the other gorgeous products I used.

Thanks for dropping by,

Kirsty

Fine Feathers!

Hello everyone,

I just held my retirement workshop yesterday and I have one of the cards to share. I used my most favourite stamp set that is retiring from the Stampin’ Up! catalogue this year, Fine Feathers. I definitely didn’t get enough use of this set, so I might just hang onto it for hobby use.

Fine Feathers

There is a lot going on on this card, but I think well worth it. After creating a circle mask with the circle framelits, I stamped the Hardwood background, followed by gold embossing the feathers. I sponged with Crumb Cake ink and then splattered the background with Calypso Coral and Whipser White.

The sentiment piece consists of Burlap ribbon, Modern Medley DSP, paper doily, Very Vintage Designer Buttons, Vellum clear embossed stamped feathers, Linen Thread, the Oh, Hello stamp set, punched with the decorative label. All this on the base of Naturals White card stock. I told you there is a lot going on, right?!

I love how this one turned out. I must say there are few of its sisters sitting in the bin all crumpled up. We won’t go there……all I’ll say is I’m rusty.

Fine Feathers

The girls enjoyed making this one, which was good news. I love working them hard. LOL!

Thanks for dropping by!

Kirsty

Christmas Stocking!

Hey everyone!

I thought I would share with you all the current promotion with SU. It is a hostess promotion and it is super cute, wait til you see it.

If you hold a workshop in the month of October and reach sales of $450, then you will receive the Stitched Stocking SS (wood or clear mount) plus the Stocking Builder punch FREE!!!! Isn’t that super awesome?!

Pretty Cute HUH?

I have seen some beautiful things made with this set. I particularly loved the hobby-horse one. I will have to make one and share it with you all. But this is what I have made with it just recently

I just used the punch for this one and punched out some Designer Series Paper. In this case I used the Beau Chateau Range. The Polka Dot one though, is from the Mocha Morning Range. I used the Vanilla Seam Binding and twisted the tails to curl and adhered them down with Mini Glue Dots. I have accompanied this card with SS’s Creative Elements, French Foliage and Established Elegance.

If you would like more information on this promotion and/or you would like to host a workshop and you live in the Lockyer Valley or Darling Downs area I will be more than happy to help. Email me today!

Thanks for dropping by!

Forever Brayer!

Hey everyone!

Can you believe I have blogged two days in a row??! LOL! I am in shock too don’t worry! I did however make this card  a couple of weeks ago and taught it in a workshop. I challenged myself and decided to do a brayered image. I haven’t played with the brayer too much, I know the basics and would love to play with it some more to learn about creating more intricate designs. Maybe a river or some mountains or both. I think I might check out Michelle Zindorf’s blog as her brayer work is simply stunning.

I also had inspiration from Kerry Bunting’s creation Thanks Karen!

I used inks, So Saffron, Calypso Coral and Tangerine Tango for this creation. I love how it has turned out, so much so I created another one in different colors

This time I used only two colours and they are Pool Party and Island Indigo. They go together beautifully, don’t you think? I am not sure which one is my fave. Do you have one? I look forward to your replies.

Thanks for dropping by!

A Princesses Castle!

Hey everyone!

I know, I know……SHOCK, HORROR! I am doing a blog post that isn’t  an Inkspirations Challenge! LOL! It had to happen sometime right?

This particular post is about my upcoming workshops here in Gatton and local city Toowoomba. After coming home from convention I was chock block full of ideas and inspiration. The inspiration for these creations originated from a swap I received from Pat Carr. Pat is one super creative punch art designer and I had a blast recreating it.

Have a look a the card class-

a closer look-

I love how cute this is and I have a recipient already in mind. She is my little princess Akayla. When she saw this she ooohhed and aahhhed for ages. Sometimes hinting at having one of her own, God Bless her! Her favourite colours too! LOL!

Okay, I also do a scrapbook workshop and I usually keep it the same theme as the card class. This makes life much easier for me, as I tend to take to looooooooong thinking about scrap pages.

I must say my daughter Jemma was horrified when she saw this photo. LOL! I think she forgot on the day of her 6th birthday party she had her face painted like a cat and then ran around for the rest of the day. She ended up looking like a witch NOT a princess!! LOL! I do love how this page turned out, but the photos doesn’t do these projects justice.

I have taken some closer ones though-

Gotta love that Champagne Mist shimmer paint and the clear embossing. I also sponged a lot of edges to add some definition to the page. I am sure the girls will love creating these projects. Thank you Pat for the inspiration!

Well that’s all I have to show you today!

Thanks for dropping by!

Mother’s Day is Coming!!!

Hey everyone!

Can you believe we are half-way through March already?! This year seems to be going much quicker than last. I’m not trying to make the year go faster by doing Mother’s Day projects, but next month I want to concentrate on the Autumn\Winter Mini Catalogue Launch. So here is some piccy’s of my upcoming workshop.

I love the combo of Rich Razzleberry, Tempting turquoise and Certainly Celery. From memory I did the Star Box in the same colours! So bright and vibrant. I have seen a few different versions of this box/purse. But I found this tutorial by Tami White on YouTube that shows a quick simple version. Super cute huh?!  It’s a very good size for Pandora/Chamilia packages or any type of jewellery. I’m not sure about you but when I have teeny tiny gifts they are hard to wrap or package nicely. I find making little packages like this are simply perfect.

If you are local to me and would like to create this project….email me and I will book you in OR if you would like to order the product to make your own at home email me and I will have the goodies delivered straight to your door!

Thanks for dropping by!

Another Easter Workshop!

Hey everyone!

I couldn’t help it….I had to make some cute Easter goodies. My kids love these sort of designs. I do too!

Aren’t they adorable?! I of course took some closer shots for you all!

This one reminds me of one of my old Easter boxes I made last year. I put a 50g bunny and solid minis inside with some shredded paper. So very easy and just a teeny bit cute!

Of course I had to use the Mini Milk Carton too. It is simply adorable and reminds me of the Cadbury Cartons. Another very simple creation. I used the teeny bunny in the Nursery Suite SDSP to put on the box amongst the hand cut grass. A couple of the punched flowers from the Itty Bitty punch set and you have a cute little garden scene.

This one is just too cute! Can anyone have enough cuteness in their life? I got the idea for this creation from Theresa Anne Rafter She has some beautiful creations for Easter on her blog. Check them out!

Well that’s all I have to show you today!

Thanks for dropping by!

Easter Blossom Silk!

Hey everyone!

I have workshops this week and I decided I would teach my class the Faux Silk technique and combine it with an Easter theme. I’m not an Easter card maker and sender, but I do love creating gift boxes for the chocolatey goodness. This time though I made a matching card for the box.

The box design is very similar to the one on page 8 of the Summer mini catalogue but with a few of my own touches added to it.

The card and some closeups of the box’s finer details

Oohh I am liking these closeups!! I might have to do that more often! LOL! The brown paper is the packing from SU deliveries. I just passed it through a shredder. The eggs are Cadbury Mini Eggs and resemble Smarties, M&M’s and the like, they are crisp shell with chocolate inside…..MMMmmmmm…YUMMY!!! I made this project with these eggs in mind. I bought them last year and just loved them. I made this project before I bought them and was hoping that they would make a comeback this year so I could use them specifically for this project. I used colours Sahara Sand, Blushing Bride and Perfect Plum.

Well I best get packing for my workshop!

Thanks for dropping by!