Engagement Party Invites!

Hello everyone!

I just recently done up some Engagement Party invites for my sister’s partner’s sister…..did you get that?! LOL! So if my sister and her partner get married it will be my sisters ‘sister in-law’. That makes more sense.

I made a few designs for her to choose from. They all had a similar layout to the Mother’s Day card I made a while back.

Which one is your favourite?

The Elegant Eggplant and Confetti White  is the one that was chosen by the ‘sister in-law’, after a lot of debating. She loved the Calypso Coral one too (my favourite). But hey, they are all nice. lol!

Thanks for dropping by!

To My Friend!

Hello everyone!

Are you enjoying all the things I made at retreat this year? I only have two more to share after this one. This one was also a challenge. I had to use the decorative frames embossing folder. It didn’t matter which one. I went with the oval anyway.

I also used some of the Crumb Cake seam binding Madonna gave us.  Yep another freebie from Mads. Did I mention that she is the best upline EVER!! I was also very proud that this was the only Crumb Cake card I made. We all know that this is my favourite colour for cards, LOL! I used stamp sets Friends Never Fade, Elements of Style, French Foliage and Friendly Phrases. I used the colours Crumb Cake, Bravo Burgundy, Pink Pirouette and Very Vanilla. You may have noticed on my Easter card also the scallop border around the oval. I used the Dotted Scallop Ribbon Border punch and used the same technique I used on my Elements of Style card. I threaded the seam binding through the sentiment piece and tied a bow. I just used a hobby knife to make the cut. Very simple. I used the Itty Bitty shapes punches to make the flowers and added a pearl in the centre. I love how petite they are. Even though they are so small I think they make a big impact on the overall look.

Thanks for dropping by!

Inkspiration Challenge #78

Hey everyone!

It is colour challenge time!

I had a lovely play with the distressing essentials kit on this one. I actually made this card back in June and was my first play with the kit. I don’t think I did too badly…LOL! But hey, practise makes perfect. I love the end result though….and these colours are right up my alley! To colour my image I used and a Blender pen and my wonder crayons, I love these things. They are so easy to colour with.

Check out the rest of the DT and leave a link to your creation at the Inkspirations Challenge Blog

Thanks for dropping by!

Melbourne Convention Workshop WOW #2

Hey everyone!

So I have made another one. I think this one is one of my favourites out of my presentation. It’s a little different but very striking, not my usual style, but hey, we have to try new things, and sometimes they work out well {we won’t mention the mishap to my butterfly onstage…okay?!}

This time round I embossed in black on Baja Breeze, bleached the image out, then dried it thoroughly with the heat tool because I used the markers to colour the image in. You don’t want to bleach out the tip of the markers so make you sure you dry it well! I used Old Olive, Rich Razzleberry and So Saffron.

It doesn’t matter what step you do first. You can do your bleaching and colouring or the butterfly cut. Whatever you feel comfortable with,

On the Beautiful Butterflies die you will notice the two half butterflies on the die. These are what you will use to cut your butterfly. Cut the big one first like normal, then place the butterfly back on the die over the top of the small butterfly. Placement can be a little tricky, you have to make sure the butterflies wingtips will not be cut by surrounding dies as they are rather close

but once you find that “sweet” spot on the die use tape to mark the position for the large folded butterfly…..like this –

It will be much easier for future use or if cutting multiple butterflies.

Well I hope you enjoyed my little presentation and I taught you something “new” at convention, also the people who couldn’t attend and are reading my blog now. I must say though the people who didn’t attend didn’t laugh at me!!! LOL! I had a blast though, and would do it again in a heartbeat!

Thanks for dropping by!

Melbourne Convention Workshop WOW!

Hey everyone!

I know that I have been promising that I would have the projects I made for my Workshop WOW uploaded and explained, but……you won’t believe this……I have to make the projects again! LOL! Unfortunately before leaving for Melbourne I forgot to take photos of all my samples. All my samples, by now, would be back at home office in NSW. So I cannot take photos of them now, LOL! So I hope to get one created each day until they are all made and I will post them here and on stampin’ connection for all to see. I do apologise. I am just lucky I have friends who have taken photos of my work up on the board at convention so I can recreate them perfectly!

Okay, for my presentation I was undecided on what technique or tip I wanted to show. I had two options that were sticking out for me. The Beautiful Butterflies die and the technique, Bleaching. In the end I decided to combine both and the two B’s were born! LOL!

My first project highlighted a simple bleaching technique, and here it is-

I stamped the image from Elements of Style {LOVE} in Versa Mark on Pretty in Pink CS. I then heat embossed clear embossing powder. Using my aqua painter filled with bleach I “coloured” the image in.

To give you a good idea what your CS will look like punch a little piece of CS out of every colour and bleach half of it so you can see what the end result will be. They don’t all go white like Pretty in Pink, Baja Breeze, Regal Rose, just to name a few. Some go yellow or in Soft Suede’s case a soft mustard. Then punch a whole through them all and place on a metal ring for future reference. This is the one I made

I keep it in the colour families for quick reference, the only colour it doesn’t seem to affect is Basic Black. Whisper White seems to lose it shiny appearance, but doing something on white would seem rather pointless! LOL!

Anyway I best be off and make those other projects.

Thanks for dropping by!

Inkspiration Challenge #69

Hey everyone!

Right now I am at convention……I am sure I am having an absolute blast, LOL! I will let you know all the deets when I get back. I will have lots to tell you!

So this weeks challenge!

Isn’t that a super cute sketch?!

My submission,

I really love how this one turned out. I haven’t played with faux roses for a while……actually ever since my presentation at Brisbane Regionals. With this card I was actually going to do it in all brown tones for that vintage look…..but I just couldn’t do it….Cherry Cobbler was screaming at me to be pulled out of its slot in the ink caddy! LOL! I also then added Pretty in Pink and Old Olive. If you’re wondering how I stamped the main image, I stamped it with Early Espresso and then clear embossed it, but that was when I thought I was doing all brown tones. I used the Aqua Painter to colour my image.

To make these particular flowers I first did the Faux suede technique where you separate the papers fibres in two. This made the flowers more pliable to create the rolled petals. I used the Little Leaves die and cut it up for the leaves.

Don’t forget to check out the rest of the DT at the Inkspirations Challenge Blog  and submit your design for all to see.

Thanks for dropping by!

Inkspiration Challenge #66

Hey everyone!

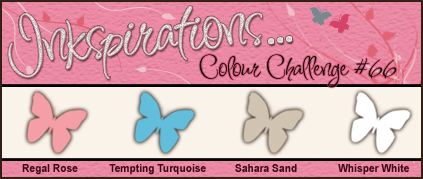
Gosh guys….sorry I am late with this post. I thought I had something ready to be published, but I didn’t have a thing not even a draft….LOL! and I thought I was going so well this week. Well its’ colour challenge week and when I first saw them I had a small “OMG” moment! LOL! Take a look-

Without further ado here is my card for this week

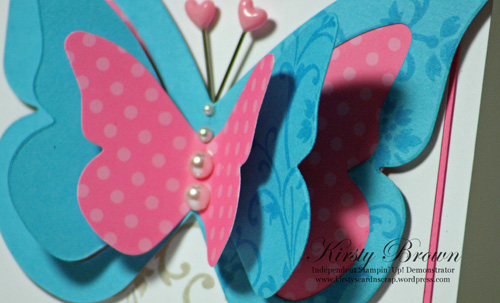
I am in love with this die right now, and I plan to have lots of fun with it in the next couple of weeks to see what else I can do with it. The two half butterflies on the die were used to create the blue part of the butterfly. Folding CS in half, I cut out the big one first and then keeping it half I strategically placed it to cut it again with the smaller butterfly. The pink DSP is one of the whole butterflies on the die. Does any of that make sense??? I am starting to think it is too late at night to explain anything in great detail! LOL!

Here’s a closer look instead

I used the flourish from the Elements of Style (surprise surprise…LOL!) to decorate the base. The basic pearls to create a body and the pins are from my scrapping stash. I have had them so long now I cannot remember buying them…….let alone where from. I have had them well before I had even heard of Stampin’ Up! LOL! It’s great to see they were put to good use. Aren’t they the cutest antenna?!

Make sure you go to the Inkspiration Challenge Blog to submit your entry and check out the rest of the DT

Thanks for dropping by!

Mother’s Day is Coming!!!

Hey everyone!

Can you believe we are half-way through March already?! This year seems to be going much quicker than last. I’m not trying to make the year go faster by doing Mother’s Day projects, but next month I want to concentrate on the Autumn\Winter Mini Catalogue Launch. So here is some piccy’s of my upcoming workshop.

I love the combo of Rich Razzleberry, Tempting turquoise and Certainly Celery. From memory I did the Star Box in the same colours! So bright and vibrant. I have seen a few different versions of this box/purse. But I found this tutorial by Tami White on YouTube that shows a quick simple version. Super cute huh?!  It’s a very good size for Pandora/Chamilia packages or any type of jewellery. I’m not sure about you but when I have teeny tiny gifts they are hard to wrap or package nicely. I find making little packages like this are simply perfect.

If you are local to me and would like to create this project….email me and I will book you in OR if you would like to order the product to make your own at home email me and I will have the goodies delivered straight to your door!

Thanks for dropping by!

Inkspirations Sketch Challenge #57

Hey everyone!

It’s Inkspiration time and I have to say I fell in love with this sketch instantly. So many possibilities……I love having lots of options LOL! This time though I wanted to play with a colour I don’t often reach for. I have a few of them you know!! Like Poppy Parade and Bravo Burgundy. Peach Parfait is on this list too and well it ended up being the colour of choice. The verdict~ I love it and will be using it more often.

This weeks sketch~


and my submission~

Don’t you just love this colour combo? So fresh and striking. Of course I would try to turn them into a vintage feel, LOL! I also found a new technique (well I don’t think it’s necessarily new but it’s the first time I did it). I could not find my sponges (have I told you lately I am losing the plot?) so instead of pulling my hair out looking for them I decided to use tissues to sponge the ink on the edges of the CS. It seems to give it a more mottled effect and I love it. If you haven’t done it before have a go!

I do love the effect of embossing in black and then watercolouring on Crumb Cake CS. I especially love doing it with the Elements of Style SS. What do you think? I might have a play later on with other colours. Make some suggestions and I might just make it for you!

Anyway check out the rest of the DT and don’t forget to go to the Inkspirations Challenge Blog to submit your creation!

Cindy
Kirsty
Makeesha
Renée
Brandi
Carrie
Helen
Ilina
Lee-Anne
Marisa

Thanks for dropping by!

Faux Silk!

I am having lots of fun with the Elements of Style set lately and the other day I thought I would revive an old fave technique. It is so super easy and also a crowd pleaser….how can you go wrong?! LOL! I will be holding workshops in the coming weeks using this technique on a few different projects. This card I am about to show you was quickly whipped up for a workshop party as show and share and they loved it.

For those who don’t know the faux silk technique this is what you do- Stamp your image as normal on your white CS, crumple up a piece of tissue paper into a very small ball (make sure this piece is bigger than your white CS base), unfold it and pull it back to the original shape, cover your stamped image with the Anywhere Glue Stick (this stuff is perfect for the job), then stick the tissue paper over the top of your stamped image and trim off excess tissue paper. There DONE!!!! See super easy.

Thanks for dropping by!