Hey everyone!
Every now and again people ask me “How did you do that?” Well I have decided to start a new addition to my blog called “How did I do it??” to answer these questions. I still haven’t mastered doing videos, so it will be step by step photos until then. I am not sure how often I will do these, I suppose it will depend on when people ask me “How did you do that?” LOL!
Lately I have received comments and emails from a lot of people who were curious about what I used for my oval shape and how I got the scallop trim around that oval on this card~
Well my friends, it is very simple and I am sure you will be doing it in no time.
However, for this to work you do need a good-sized oval to place your trim around the edge…..you will see why in a minute.
I do not yet own the Original Die Ovals for the Big Shot (I’m also not sure if the oval would be big enough either, but give it a go), so every time a sketch calls for an oval shape I improvise and I usually use this~
I purchased these little mini baskets in a set of three from Coles quite a while ago (I hear they were also at Crazy Clarks and the like). I use them as bins for the table during workshops. Very cute and they came in three colours too. All I do is place the bin on my CS, trace around it and then cut it out.
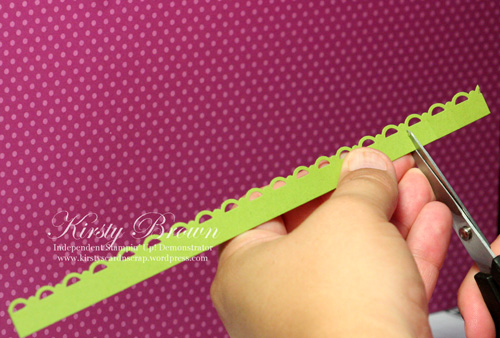
Now for the trim. I start with an A4 length of CS approx 2cm wide and scallop trim the whole length. Then at every scallop I make a snip~
Of course you don’t cut all the way through, but just about level with the base of the scallop.
Then run adhesive along the edge of your oval~
Then start adhering the trim. Start from the front so you can see how the trim will sit. You will alternate sides when adhering to help it go round evenly~
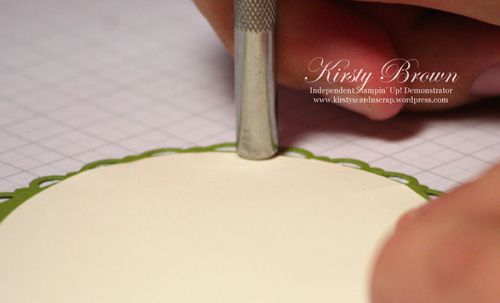
When you have adhered it all the way round, you will notice little bubbles of CS at the joins, lay it down flat and use the reverse side of your paper piercer to flatten them. This is why you wouldn’t use a smaller oval, your bubbles of CS would be more like road bumps….and it will distort your scallop a little also. But don’t let me stop you, you might find a way to get it around nicely, if you do let me know!
I didn’t do this example perfectly but I am sure you get the idea! What I did to hide the join was add ribbon, this helps hide it especially if the join doesn’t marry up exactly. I punched the slot on the main image and threaded the ribbon through and tied a bow.
Well I hope that answers everyone’s questions. If, of course, you don’t own a pretty mini basket (everyone should have one of these…LOL!), look around you, especially the kitchen for oval shapes you can trace. I will one day purchase a set of oval Nesties so I don’t have to trace my mini basket anymore.


A great “How To” Kirsty!! Love your oval template 🙂 Thanks for sharing how easy this gorgeous frame actually is!!
LikeLike
Thats great. thanks for showing this How to! Really adds to the frame.
LikeLike
Great idea Kirsty, thanks for sharing. Love the ideaof “how did I do it”!!!
LikeLike
Aren’t you a clever chick?! And thanks for the tutorial on how to scallop trim the oval, Kirsty. You’re a star!
LikeLike
Okkkkkk you are now OFFICIALLY cleverer than David the chicken coop man! This is such a cool little trick Kirsty, must give this one a try!
K
x
LikeLike
I like, I like!!! Guess what I am using on my challenge cards this afternoon. Thanks Kirsty
LikeLike
Brilliant! What a fantastic idea!
LikeLike
Very nice Kristy thanks for sharing with us! Love the idea1
Vickie
LikeLike
Wow! The idea with the oval scalloped border is fabulous! I have a lot of circle and oval nestabilities but nothing to dress them up. I will be definately doing this on my next card!!!!!
Kerry
LikeLike
Thanks so much, Kirsty! I even have a set of those exact oval bins, and the rectangle versions too! I use them in workshops & classes but have never thought to trace them 🙂
LikeLike
Thanks sooo much for sharing Kirsty.
Tammy
LikeLike
Thank you for a FABULOUS tutorial on how to do that!!! 🙂
LikeLike
holy macaroni! that’s fabulous!
LikeLike
Pingback: To My Friend! « Kirstys cards ‘n’ scrapping
This is amazing! Now I have another use for those border punches and I don’t have to worry about having everything from the one company so it all “fits” together. Thanks for sharing.
LikeLike